3. EXPORT MAPS
The Export Maps module is used to easily and quickly print maps from the Mawis Geoportal. The user can save or share the printed map.
In the module’s work panel, you can set map field parameters, out-of-frame data, and file options.
Instead of a traditional map field, a live preview of the printed map is displayed on a standardized A-size paper surface. The map content is generated according to the previously set map layers in the Map Layer Organizer. The user can switch between the modules without losing any adjustments in the map settings. By grabbing the map field and dragging with the left mouse button, or zooming using the mouse wheel, the displayed area can be fine-tuned.
SETTING MAP OUTPUT
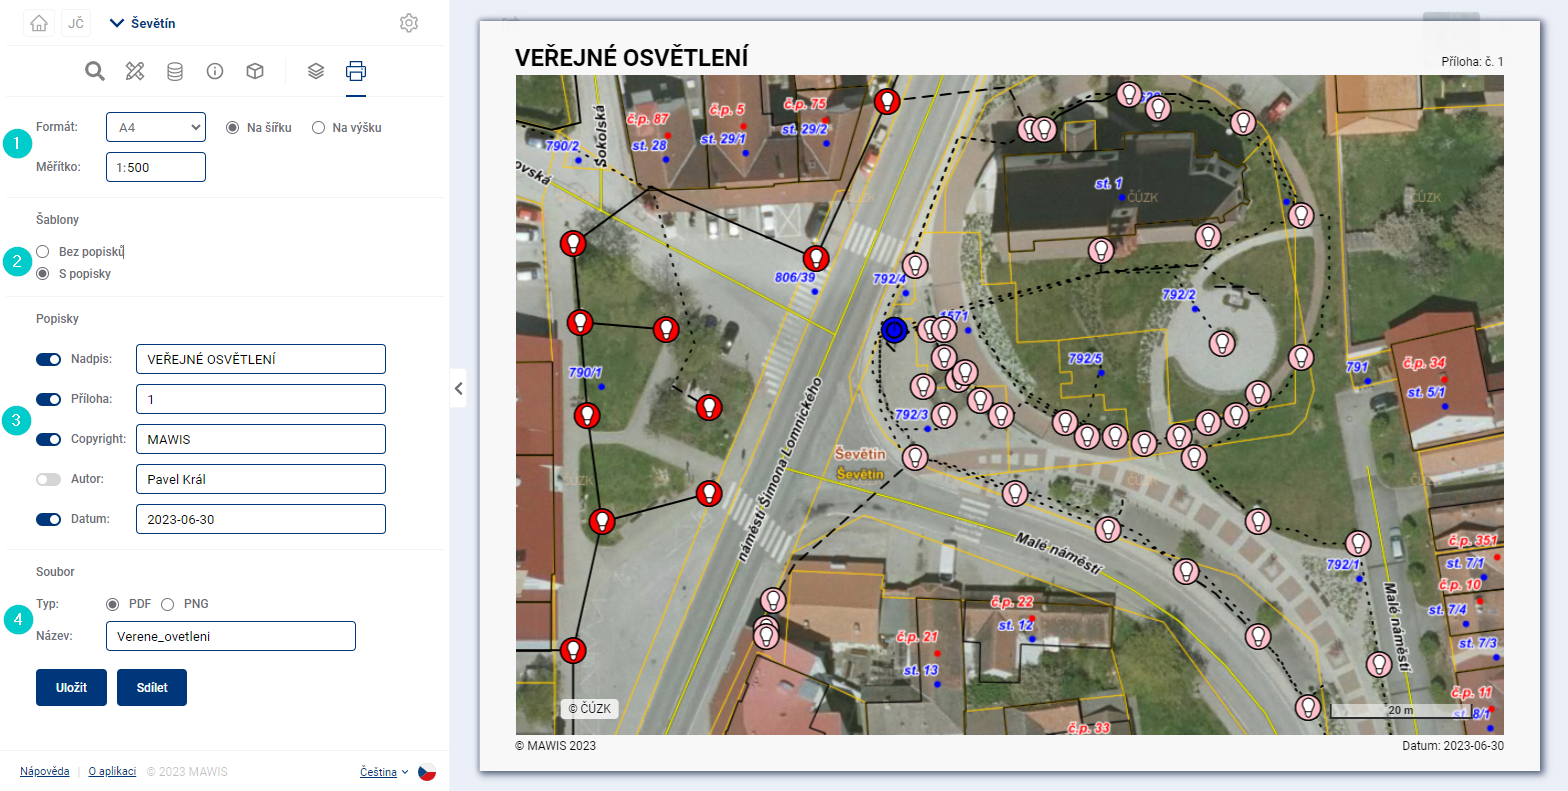
1. Format and scale
Users can choose from standard paper sizes ranging from A2 to A5 (the administrator can allow sizes up to A0) in portrait or landscape orientation. The scale can be set to virtually any value.
It is recommended to choose the format and scale according to the size, shape of the area and the desired level of detail or your own priorities. To maintain clarity, map markers should not overlap too much. The map can always be divided into several sheets. The scale is by convention a round number with a zero at the end.
2. Templates
You can set whether the map field will cover the entire sheet or whether any out-of-frame data will be added in the output frame.
The map frame is recommended e.g. if the map is intended for printing. A map without a frame may be suitable if the aim is only to record the current map field display in an image.
3. Out-of-frame data
In the left part you can set the out-of-frame data to be displayed on the map. The text field in the left part is used to write your own title, attachment number, author’s name, etc. In case of a copyright, the application will automatically add the current year.
The map title is normally written in capital letters.
4. Pictures
Whether it is possible to turn on and off the images to be included in the map. This can be for example a legend or a company logo. The menu of images and their size and position in the print window is determined by the configuration, so you need to contact the project administrator.
5. File
In the last section of the settings, you can choose whether to save the file as a PDF or PNG and enter a file name. You can also select the print quality (DPI)—medium (150) or high (300). Higher quality increases the size of the exported file. Finally, all you need to do is click the button to save the map to a file or share it. If you choose to share it, you can copy a link that allows anyone with an internet connection to download the exported map.